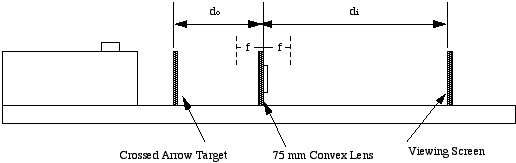
Fig 13-1: The Converging Lens Set Up
PROCEDURE
1. Open the Worksheet
and fill in the header information.
2. Set up the equipment as shown in Fig. 13-1. Turn on the light source and slide the lens toward or away from the crossed arrow target to focus the image of the target onto the viewing screen. Answer Questions 1 through 3 on the Worksheet.
Fig 13-1: The Converging Lens Set Up
3. Remove the light source and the crossed arrow
target and then move the viewing screen backward or forward
to get a sharp image of an object that is distant, or "far away".
An object that is more than 7.5 meters (about 25 feet) should be
sufficiently "far away" as shown in Fig. 13-2. The object distance is
so large that we may consider it to be infinitely large. This means that
the quantity (1/do) is zero
and di = f.
In this manner, we can directly measure the focal length. Record this length
(in mm) in cell E33.
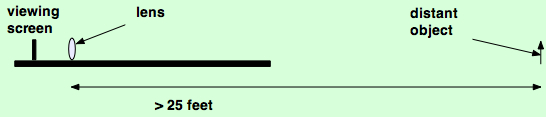
Fig 13-2: Lens Set Up for Distant Object
4. Reposition the light source and the crossed arrow
target on the bench, setting do in turn to the
following values: 500, 450, 400, 350, 300, 250, 200, 150, and 100 mm.
Record the height of the object in cell E39, and use Edit...Fill...Down to place the same value in all the cells in the column E40:E47.
At each object distance setting you should perform the following measurements:
Move the viewing screen to get a sharp image and measure and record di in cells D39:D47.
Measure and record the height of the image, hi , in cells F39:F47.
When finished, the table in cells C39:F47 should be complete.
5. Next, try do
= 70 mm and then 50 mm. At each of these do
values you will not be able to find an image that will focus on the screen.
Try looking back through the lens at the object and determine what the
nature of the image is. Discuss your observations in Questions 4
and 5 on the Worksheet.