Volume of a cylinder = cross-sectional area x length
V = A·L = π r2 L = πd2 L/4
Volume of a rectangular solid = length x width x height
V = L·W·H
Density = mass / volume
ρ =
M / V
Standard Deviation of the Mean

DENSITY MEASUREMENT
PRELAB
PURPOSE
To learn how to use a meter stick, vernier caliper, micrometer and balance, how to calculate density, and how to combine estimates of error.
MATERIALSruler, vernier caliper, micrometer caliper, 4 metal cylinders, triple beam balance
RELEVANT EQUATIONS
Volume of a cylinder = cross-sectional area x length
V = A·L = π r2 L = πd2 L/4
Volume of a rectangular solid = length x width x height
V = L·W·H
Density = mass / volume
ρ =
M / V
Standard Deviation of the Mean

DISCUSSION
Using a Meter Stick
A common mistake in using a meter stick is to position the stick against the object to be measured as illustrated in Figure 02-1. Such a procedure introduces the possibility of two types of measuring error: parallax, and zero error.
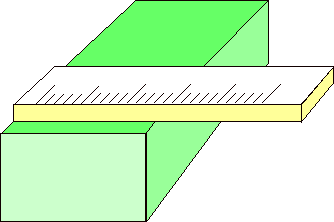
Figure 02-1. INCORRECT placement of meter stick
1) Parallax
Parallax is the change in apparent position when an object is viewed from two separate points. For example, if you hold up two fingers in line with your nose and move your head from side to side while viewing them, you will notice an exchange in the relative position of the fingers as you change
your point of view. This is parallax. In the case of a meter stick placed as in Fig. 02-2, if you do not look straight at the scale, any distance between the scale and the object to be measured will shift the apparent value.
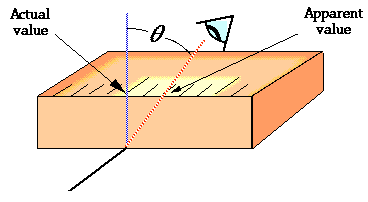
Figure 02-2. Illustration of parallax error caused by improper placement and/or viewing of meter stick
To avoid parallax, the scale of the measuring instrument should be placed as close as possible to the object being measured. Figure 02-3 illustrates proper placement of a meter stick on a block to be measured.
2) Zero Error
Zero error occurs when the normal zero position of a measuring device is incorrect, for instance when a meter stick is worn at the end, a balance does not read zero when empty, or the jaws of a caliper meet improperly. To avoid such errors with a meter stick, one should avoid using the end altogether. Choose an arbitrary mark as the "zero" from which to make all measurements.
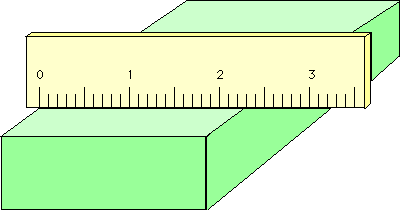
Figure 02-3. CORRECT placement of a meter stick.
For devices like vernier calipers, micrometers, and balances, check to see that the zero position is correct. Such devices should read zero when closed and they should close completely. Check balances to see that they read zero when empty. You may be able to adjust the device to correct for zero error, but usually it is easier to record the error and use it as the zero mark for all measurements.
Reading a Vernier Scale
A vernier is an auxiliary scale on a measuring instrument which makes it possible to accurately read fractional divisions of the main scale. A common form of vernier in the metric system has 10 divisions on the vernier scale covering nine divisions on the main scale. See Figure 02-4.
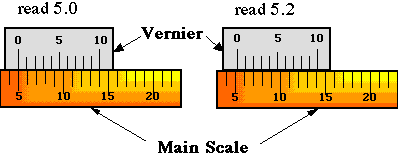
Figure 02-4. Illustration of the Use of the Vernier Scale
For example, if the smallest main scale division is 1 mm, then the vernier scale is 9 mm long and each division of the vernier scale is 0.9 mm. That is, a vernier scale division is 0.1 mm shorter than a main scale division. In general, if n divisions on the vernier scale cover (n - 1) divisions on the main scale, then the difference in length between a vernier division and a main scale division is 1/n of a main scale division. This is called the least count of the instrument. For instance, the least count of the device illustrated is: 1/10 x 1 mm = 0.1 mm.
Refer again to Figure 02-4. If zero on the vernier coincides with the 5 division mark on the main scale, then the first vernier mark will be 1/10 of a main scale division to the left of the main scale 6 division mark. The second vernier mark will be 2/10 to the left of the next main scale mark, and so forth. Consequently, if the vernier were moved ahead so that the second vernier mark lined up with the 7 division mark on the main scale, the zero vernier mark would be 2/10 of a main scale division to the right of the 5 division mark on the main scale. The reading would then be 5.2 as illustrated in the right part of the figure.
To read a vernier, follow these steps:
2. Read the main scale division at or just to the left of the zero mark of the vernier. (5 in the above example)
3. Note which vernier division lines up with a main scale division. Multiply the number of this vernier division by the least count and add this result to the main scale reading. ( 5.0 + 2 x 0.1 = 5.2 mm in the above example)
A micrometer caliper is essentially a precision screw mounted in an open frame with suitable scales. Instead of using a vernier scale to improve precision, a micrometer uses two scales: a barrel scale and a circular scale. See Figure 02-5 below.
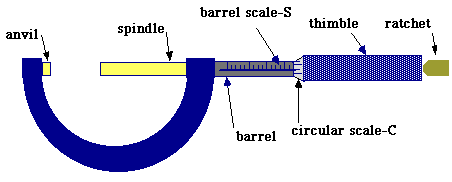
Figure 02-5. The micrometer caliper
To read a micrometer, follow these steps:
2. Next note the number of divisions on the circular scale C of the thimble. (e.g. 50)
3. Determine the number of complete turns required to move the thimble one division on the barrel scale S. Multiply the turns by the number of scale divisions per turn. (e.g. 2 turns x 50 divs/turn = 100 divisions)
4. Divide the smallest division
on the barrel scale S by the number of divisions determined from
step 3. This is the least count of the micrometer. (e.g.
1 mm / 100 = .01 mm)
In taking measurements with the micrometer, several precautions are necessary. Often, two turns of the thimble are required to advance one division along the barrel scale, so you will need to be aware of whether one of these turns already has been made when reading the circular scale. For instance, a micrometer with mm markings on the barrel scale and 50 divisions on the circular scale, but which requires two turns to advance one unit along the main scale has a least count of 1 mm / ( 2 x 50) = .01 mm. A reading of "25" on the circular scale of such a micrometer therefore could mean either .25 mm or .75 mm (.50 + .25). The operator must be able to discern these readings.
The threads of most micrometer screws are very delicate and easily distorted by forcing the jaws against the object being measured. Even without distortion, different readings will result from different applied force of the micrometer jaws. Most micrometers have a ratchet on the end which will slip when the proper force is applied. Use this ratchet to insure constant pressure when taking measurements.
Another precaution is to check for zero error and to make suitable corrections. Most micrometers can be mechanically adjusted to eliminate zero error, but we will not make these adjustments. Simply correct for the zero error.
In this experiment, you will determine the volume of a set of three cylinders by measuring the length and the diameter of each one. In the first procedure, you will do this using the meter stick alone. In the second procedure, you will use the vernier and micrometer calipers to make the measurements. The volume determination combined with a measurement of the mass using the triple beam balance will be used to calculate the density in each case. A careful comparison of the accuracy associated with each measurement will be made.